Workspace Members
Members are the people who have access to your SetGet workspace. Every person who needs to view, create, or manage work in the workspace must be added as a member. SetGet supports three workspace-level roles — Admin, Member, and Guest — each with different permissions. This page covers the full lifecycle of managing members.
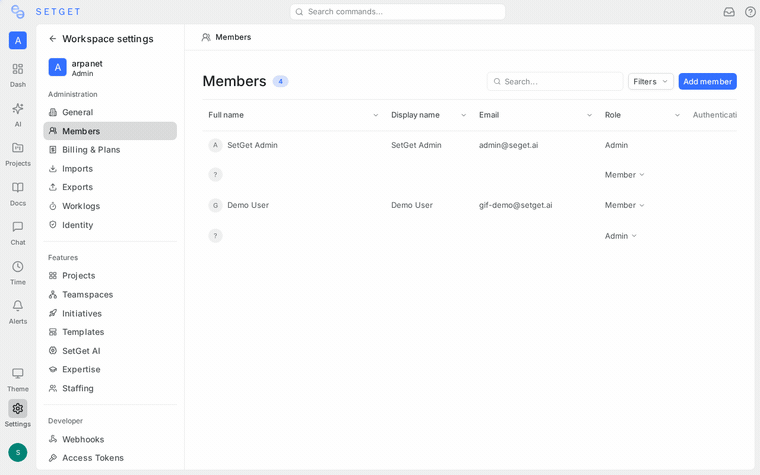
Viewing the member list
- Open Settings from the sidebar.
- Click Members in the settings menu.
The member list shows every person in the workspace along with:
| Column | Description |
|---|---|
| Name | Display name and avatar |
| The email address associated with the account | |
| Role | Current workspace role (Admin, Member, or Guest) |
| Joined | Date the member accepted the invitation |
| Last active | Most recent activity timestamp |
You can sort the list by any column and use the search bar to filter by name or email.
Inviting members
Single invite
- Go to Settings > Members.
- Click Invite Members.
- Enter the email address of the person you want to invite.
- Select a role: Admin, Member, or Guest.
- Click Send Invitation.
The invitee receives an email with a link to join the workspace. If they do not already have a SetGet account, the link guides them through account creation first.
Bulk invite
To invite multiple people at once:
- Go to Settings > Members.
- Click Invite Members.
- Enter multiple email addresses separated by commas or new lines.
- Select a default role for all invitees. You can change individual roles after they join.
- Click Send Invitations.
TIP
Bulk invite is useful during initial workspace setup when onboarding an entire team. You can invite up to 50 people in a single batch.
Pending invitations
Invitations that have been sent but not yet accepted appear in the Pending tab on the Members page.
For each pending invitation, you can see:
| Field | Description |
|---|---|
| The invited email address | |
| Role | The role assigned at invitation time |
| Sent | When the invitation was sent |
| Status | Pending or expired |
Resending an invitation
If an invitee did not receive the email or the link expired, click the Resend button next to the pending invitation. A new email is sent with a fresh link.
Revoking an invitation
To cancel a pending invitation before it is accepted, click the Revoke button. The invitation link becomes invalid immediately.
Changing member roles
Workspace Admins can change the role of any member:
- Go to Settings > Members.
- Find the member in the list.
- Click the role dropdown next to their name.
- Select the new role: Admin, Member, or Guest.
- The change takes effect immediately.
Role descriptions
| Role | Scope |
|---|---|
| Admin | Full control over workspace settings, billing, members, and all projects |
| Member | Can create and manage projects and work items but cannot modify workspace settings or billing |
| Guest | Read-only access to projects they are explicitly invited to; cannot create projects |
See Roles and Permissions for the complete permissions matrix.
WARNING
A workspace must have at least one Admin at all times. You cannot demote the last remaining Admin.
Removing members
To remove a member from the workspace:
- Go to Settings > Members.
- Find the member in the list.
- Click the three-dot menu on the right side of their row.
- Select Remove from Workspace.
- Confirm the removal.
When a member is removed:
- They lose access to all projects in the workspace immediately.
- Work items assigned to them remain assigned but can be reassigned by other members.
- Their past activity (comments, changes, uploads) is preserved for audit purposes.
- They can be re-invited later if needed.
WARNING
Removing a member does not delete their SetGet account. They can still access other workspaces they belong to.
Member activity
Each member has an activity summary that Admins can view:
- Click a member's name in the member list.
- The member detail panel shows:
- Number of work items assigned
- Number of work items completed
- Recent activity feed (last 30 days)
- Projects they belong to
This information helps Admins understand workload distribution and engagement.
Leaving a workspace
Members can leave a workspace voluntarily:
- Click the workspace selector in the top-left corner.
- Click the three-dot menu next to the workspace name.
- Select Leave Workspace.
- Confirm.
Admins cannot leave if they are the last Admin. They must promote another member to Admin first.
Member limits
Member limits depend on your plan:
| Plan | Member limit |
|---|---|
| Free | Up to 12 members |
| Pro | Unlimited |
| Business | Unlimited |
| Enterprise | Unlimited |
See Plans and Pricing for full plan details.
Related pages
- Roles and Permissions — Complete permissions matrix
- Teamspaces — Organize members into cross-project teams
- Workspace Overview — Create and configure workspaces
- Plans and Pricing — Member limits and plan features