Project Members
Project membership controls who can see and interact with a project's contents. While workspace membership determines who belongs to your organization, project membership determines who can work within a specific project. This two-level model lets you grant broad workspace access while keeping individual projects restricted to the people who need them.
How project membership works
- A user must first be a workspace member before they can be added to any project.
- Public projects are visible to all workspace members, but only project members can be assigned work items or manage settings.
- Secret projects are invisible to non-members — they do not appear in the sidebar, search, or any listing.
- Every project member has a role that controls their permissions within that project.
Add members to a project
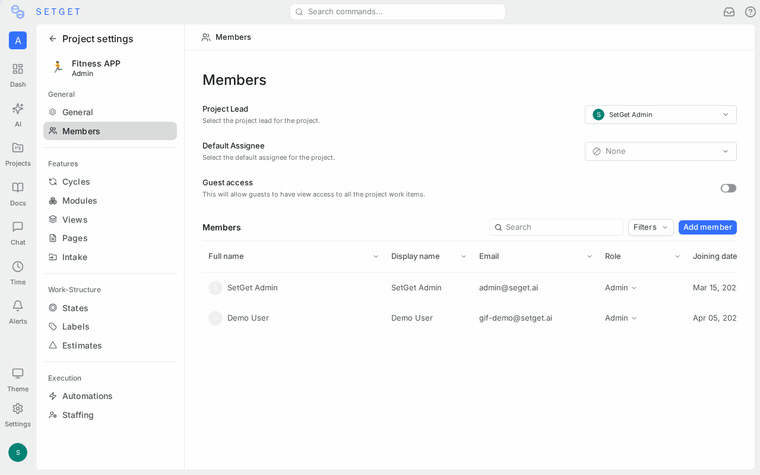
- Open the project and go to Settings > Members.
- Click Add Member.
- Search for workspace members by name or email. You can select multiple members at once.
- Choose the role for the new members (Admin, Member, Viewer, or Guest).
- Click Add.
The added members immediately gain access to the project according to their assigned role.
TIP
When you create a new project, you are automatically added as its Admin. You can then invite other workspace members as needed.
Bulk add members
If you need to add many members at once:
- Go to Settings > Members.
- Click Add Member.
- Select all the workspace members you want to add from the dropdown.
- Assign them a common role.
- Click Add.
All selected members are added simultaneously with the same role. You can change individual roles afterward.
Project roles and permissions
Each project member is assigned one of four roles:
| Role | Description |
|---|---|
| Admin | Full project control. Can manage settings, members, states, labels, estimates, automations, and all content. |
| Member | Can create, edit, and delete work items. Can participate in cycles, modules, and pages. Cannot change project settings or manage other members. |
| Viewer | Read-only access to all project content. Can view work items, pages, cycles, and modules but cannot create or edit anything. |
| Guest | Restricted read access. Intended for external stakeholders who need visibility into specific aspects of the project. |
Detailed permission matrix
| Action | Admin | Member | Viewer | Guest |
|---|---|---|---|---|
| View work items | Yes | Yes | Yes | Yes |
| Create work items | Yes | Yes | No | No |
| Edit work items | Yes | Yes | No | No |
| Delete work items | Yes | Yes | No | No |
| Manage cycles | Yes | Yes | No | No |
| Manage modules | Yes | Yes | No | No |
| Create and edit pages | Yes | Yes | No | No |
| Manage views | Yes | Yes | Yes | No |
| Change project settings | Yes | No | No | No |
| Add or remove members | Yes | No | No | No |
| Manage states and labels | Yes | No | No | No |
| Configure estimates | Yes | No | No | No |
| Configure automations | Yes | No | No | No |
| Archive or delete the project | Yes | No | No | No |
Set the default project role
The default project role determines which role is automatically assigned when a new member joins the project (for example, when someone clicks Join Project on a public project).
- Go to Settings > Members.
- Find the Default Role dropdown.
- Select the desired role (Admin, Member, Viewer, or Guest).
- The setting is saved automatically.
TIP
For most teams, Member is the best default role. It gives new joiners the ability to contribute immediately without granting them administrative access.
Change a member's role
- Go to Settings > Members.
- Find the member in the list.
- Click the role dropdown next to their name.
- Select the new role.
- The change takes effect immediately.
WARNING
You cannot demote yourself from Admin if you are the only Admin on the project. Assign another Admin first before changing your own role.
Remove members
- Go to Settings > Members.
- Find the member you want to remove.
- Click the ... menu or the remove icon next to their name.
- Confirm the removal.
When a member is removed:
- They immediately lose access to the project.
- Work items assigned to them remain assigned but will appear as unresolvable references in some views.
- Their past activity (comments, edits, state changes) is preserved in the project history.
- For Secret projects, the project disappears from their sidebar entirely.
TIP
Before removing someone, consider reassigning their open work items to another member. Use the Bulk Edit feature in the work items view to reassign multiple items at once.
Member defaults for new items
Project Admins can configure default values that are applied when any member creates a new work item:
| Default | Description |
|---|---|
| Default State | The initial state assigned to new work items (configured in States) |
| Default Priority | The initial priority level for new work items |
| Default Assignee | Optionally auto-assign new items to a specific member or the creator |
| Default Label | Optionally attach a label to all new items |
These defaults reduce repetitive configuration and help maintain consistency across the project. They can be overridden on individual items at any time.
How project membership interacts with workspace roles
Workspace roles and project roles are independent but complementary:
| Workspace Role | Effect on Projects |
|---|---|
| Workspace Admin | Can access all projects (including Secret ones) and override project-level settings if needed. Automatically has Admin-equivalent access to every project. |
| Workspace Member | Can see Public projects and join them. Must be invited to Secret projects. Project-level role determines permissions. |
| Workspace Guest | Can only access projects they are explicitly invited to. Limited to Guest or Viewer roles at the project level. |
WARNING
A Workspace Admin can always access any project regardless of project-level membership. If you need to restrict a Workspace Admin from a project, you must change their workspace role first.
Best practices
- Keep membership intentional — for Secret projects, only add the people who genuinely need access. Avoid adding the entire team "just in case."
- Use Viewer for stakeholders — give managers, clients, or cross-functional partners Viewer access so they can follow progress without accidentally modifying anything.
- Audit membership periodically — as teams change, review project members to remove people who have moved to other teams or left the organization.
- Set the right default role — if your project is Public and many people self-join, make sure the default role matches what you want most members to do.
Related pages
- Manage Projects — Create and configure projects
- Project Settings — Full settings reference
- Workspace Members — Manage workspace-level membership
- Roles and Permissions — Workspace-level access controls
- Work Items Overview — Create and manage work within projects