Create a Workspace
A workspace is the top-level container in SetGet. It holds all of your team's projects, members, pages, chat channels, and settings. Every organization starts by creating at least one workspace. This tutorial walks you through the entire process, from choosing a name to configuring your first preferences.
Prerequisites
- A SetGet account. If you do not have one yet, sign up at your organization's SetGet instance.
- You must be signed in. Any authenticated user can create a new workspace.
What is a workspace?
Before diving into the steps, it helps to understand what a workspace represents:
- Isolation boundary — Each workspace has its own members, projects, and data. Members of one workspace cannot see another workspace's content unless they are invited to both.
- Billing unit — If your SetGet instance uses per-workspace billing, each workspace is billed independently.
- URL namespace — Your workspace gets a unique slug that appears in every URL, such as
app.setget.io/my-team/projects.
Most small-to-medium teams need only one workspace. Larger organizations sometimes create separate workspaces for different departments or business units.
Step 1: Open the workspace creation screen
After signing in, SetGet checks whether you belong to any workspaces. If this is your first time, you are taken directly to the workspace creation screen.
If you already belong to a workspace and want to create an additional one:
- Click your workspace name in the top-left corner of the sidebar.
- At the bottom of the workspace switcher dropdown, click Create workspace.
Step 2: Choose a workspace name
Enter a display name for your workspace. This is the human-readable name your team will see throughout the interface — in the sidebar, notifications, and emails.
Guidelines for choosing a good name:
- Use your team or organization name (e.g., "Acme Engineering", "Product Team").
- Keep it short and recognizable. You can always change it later in workspace settings.
- Avoid generic names like "My Workspace" if you plan to have multiple workspaces.
Step 3: Set the URL slug
SetGet automatically generates a URL slug based on your workspace name. The slug is the URL-safe identifier that appears in all workspace URLs.
For example, if your workspace name is "Acme Engineering", the suggested slug might be acme-engineering.
Slug rules:
- Must be unique across the SetGet instance.
- Can contain only lowercase letters, numbers, and hyphens.
- Cannot start or end with a hyphen.
- Must be between 3 and 48 characters.
You can customize the slug before creating the workspace. Choose something short and memorable — your team will type or see this slug frequently.
WARNING
Changing the slug after creation is possible but will break any bookmarked or shared links that use the old slug. Pick a slug you are comfortable keeping long-term.
Step 4: Set workspace size (optional)
Some SetGet instances ask you to indicate your expected team size during creation. This helps SetGet optimize the default configuration. Options typically include:
- Just me — Solo use or evaluation
- 2-10 — Small team
- 11-50 — Growing team
- 51-200 — Mid-size organization
- 200+ — Large organization
This setting does not impose any hard limits. You can invite as many members as your plan allows regardless of the selection.
Step 5: Review and create
Review your workspace name and slug. When everything looks correct, click Create Workspace. SetGet will:
- Provision the workspace and its default settings.
- Set you as the workspace Owner with full administrative privileges.
- Redirect you to the workspace home screen.
The entire process takes only a few seconds.
Step 6: Configure initial settings
After creation, you may want to adjust a few settings before inviting your team. Navigate to Settings in the sidebar (gear icon) to access workspace configuration.
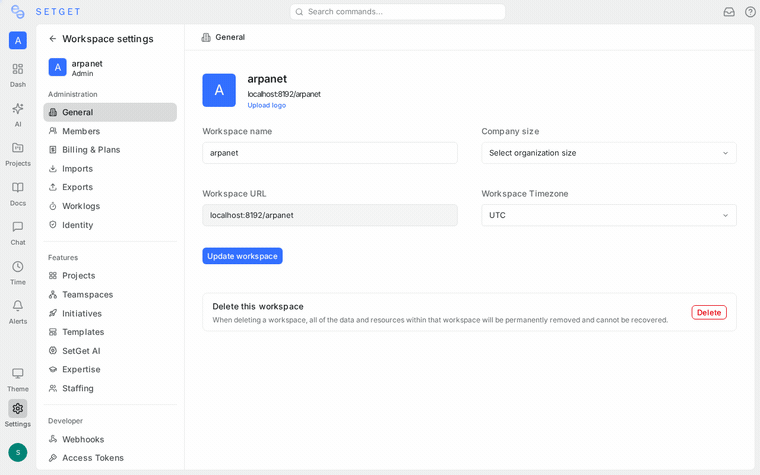
General settings
- Workspace name — Update the display name at any time.
- Workspace logo — Upload a logo or icon that appears in the sidebar and emails.
- Workspace slug — Change the URL slug if needed (see warning above).
Members and roles
Your workspace starts with you as the sole member. The next tutorial, Invite Members, covers adding teammates in detail.
Features
SetGet lets you toggle workspace-level features on or off. Review the available toggles to decide which capabilities your team needs from day one:
- Cycles — Enable time-boxed sprint planning.
- Modules — Enable feature-based work grouping.
- Pages — Enable the built-in wiki and documentation editor.
- Chat — Enable real-time messaging channels.
- AI assistant — Enable AI-powered workspace insights.
You can enable or disable any of these at any time without losing data.
Tips
- Start with one workspace. If you are evaluating SetGet, a single workspace is sufficient. You can always create more later.
- Use a consistent naming convention. If your organization will have multiple workspaces, agree on a naming pattern early (e.g., department name, product name).
- Bookmark your workspace URL. After creation, bookmark
<your-instance>/<slug>for quick access. - Explore the sidebar. After creation, take a minute to click through the sidebar sections — Projects, Cycles, Modules, Pages, Chat, and Settings — to familiarize yourself with the layout.
What happens next
With your workspace created, you are ready to bring your team on board. The next step is inviting members and assigning roles so everyone has the right level of access.
Related pages
- Invite Members — Next tutorial: add teammates to your workspace
- Core Concepts — Understand the workspace hierarchy
- Workspaces — Detailed workspace documentation
- Tutorials Overview — Browse all available tutorials