İşleri Düzenleme ve Görüntüleme
SetGet, iş öğelerinizi görüntülemek için beş farklı görünüm, gördüğünüzü daraltmak için esnek bir filtre sistemi ve tekrar tekrar kullandığınız yapılandırmaları korumak için kaydedilmiş görünümler sunar. Bu rehber, iş akışınıza uygun görünümü bulmanız için her seçeneği kapsar.
Ön koşullar
Bu rehbere başlamadan önce şunlara sahip olduğunuzdan emin olun:
- En az bir proje içeren bir SetGet çalışma alanı.
- Filtreleme ve gruplama işlemlerinin görünür sonuçlar üretmesi için farklı durumlar, öncelikler, atananlar ve etiketlere sahip birkaç iş öğesi.
- Projede Üye düzeyinde veya daha yüksek erişim.
Adım 1 — Yerleşimler Arasında Geçiş Yapın
SetGet'teki her proje beş görünümü destekler. Sayfanın üstüne yakın proje araç çubuğundaki görünüm seçicisini kullanarak aralarında geçiş yapabilirsiniz.
Liste Yerleşimi
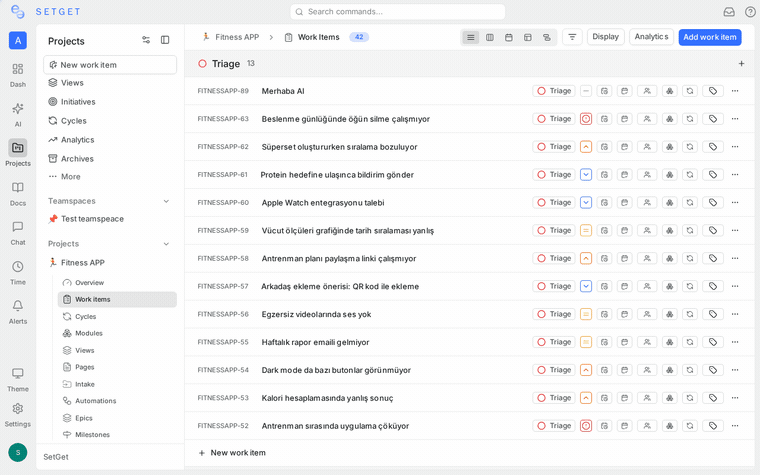
Liste görünümü, iş öğelerini düz veya gruplanmış bir satır listesi olarak gösterir. Her satır, öğenin tanımlayıcısını, başlığını, durumunu, önceliğini, atananını ve diğer temel alanları gösterir. Bu, çok sayıda öğeyi hızla taramak için en iyi görünümdür.
- Etkinleştirmek için yerleşim seçicisindeki Liste simgesine tıklayın.
- Alt öğeleri satır içi görüntülemek için herhangi bir satırdaki genişletme okunu kullanın.
Kanban Yerleşimi
Kanban görünümü, iş öğelerini sütunlara düzenler. Varsayılan olarak, sütunlar durumları temsil eder (Backlog, Yapılacak, Devam Ediyor, Bitti, İptal Edildi), ancak öncelik, atanan, etiket veya diğer alanlara göre gruplayabilirsiniz.
- Bu yerleşime geçmek için Kanban simgesine tıklayın.
- Gruplama özelliğini değiştirmek için kartları sütunlar arasında sürükleyip bırakın (örneğin, bir kartı "Devam Ediyor"dan "Bitti"ye sürüklemek durumunu değiştirir).
Hesap Tablosu Yerleşimi
Tablo görünümü, iş öğelerini düzenlenebilir hücrelerle bir ızgarada sunar. Detay görünümünü açmadan özellikleri doğrudan ızgarada güncelleyebilirsiniz.
- Etkinleştirmek için Hesap Tablosu simgesine tıklayın.
- Değerini satır içi düzenlemek için herhangi bir hücreye tıklayın.
- Hücreler arasında hareket etmek için Tab tuşunu kullanın.
İPUCU
Hesap Tablosu yerleşimi toplu güncellemeler için idealdir. Tek bir oturumda birçok öğenin önceliğini, atananını veya tarihlerini hızla değiştirebilirsiniz.
Takvim Yerleşimi
Takvim görünümü, iş öğelerini teslim tarihlerine göre aylık veya haftalık takvim ızgarasında gösterir.
- Geçiş yapmak için Takvim simgesine tıklayın.
- Teslim tarihi olmayan öğeler takvimde görünmez.
- Teslim tarihini güncellemek için bir öğeyi farklı bir tarihe sürükleyin.
Gantt Yerleşimi
Gantt görünümü, iş öğelerini zaman çizelgesinde yatay çubuklar olarak gösterir; başlangıç tarihlerini, teslim tarihlerini ve süreleri gösterir.
- Etkinleştirmek için Gantt simgesine tıklayın.
- Öğelerin doğru şekilde oluşturulması için hem başlangıç tarihi hem de teslim tarihi olması gerekir.
- Tarihleri ayarlamak için bir çubuğun kenarlarını sürükleyin veya tarih aralığını kaydırmak için tüm çubuğu sürükleyin.
UYARI
İş öğelerinizin çoğunda tarih alanları yoksa, Takvim ve Gantt yerleşimleri boş görünecektir. Bu görünümlerden en iyi şekilde yararlanmak için öğelerinize başlangıç ve teslim tarihleri belirleyin.
Adım 2 — Filtre Uygulayın
Filtreler, görünen iş öğelerini tam olarak ihtiyacınız olana daraltmanızı sağlar. Filtre panelini açmak için proje araç çubuğundaki Filtre butonuna tıklayın.
Kullanılabilir Filtre Özellikleri
| Filtre | Açıklama |
|---|---|
| Durum | Bir veya daha fazla duruma göre filtreleyin (Backlog, Devam Ediyor, Bitti vb.) |
| Öncelik | Acil, Yüksek, Orta, Düşük veya Yok'a göre filtreleyin |
| Atanan | Belirli üyelere atanmış öğeleri gösterin |
| Etiket | Bir veya daha fazla proje etiketine göre filtreleyin |
| Döngü | Yalnızca belirli bir döngüdeki öğeleri gösterin |
| Modül | Yalnızca belirli bir modüldeki öğeleri gösterin |
| Teslim tarihi | Tarih aralığına, bir tarihten önce/sonra veya gecikmiş olarak filtreleyin |
| Başlangıç tarihi | Başlangıç tarihi aralığına göre filtreleyin |
| Oluşturan | Belirli bir üye tarafından oluşturulan öğeleri gösterin |
| Abone | Belirli bir üyenin abone olduğu öğeleri gösterin |
| Bahsedilen | Belirli bir üyenin @bahsedildiği öğeleri gösterin |
| Oluşturma tarihi | Öğenin oluşturulduğu zamana göre filtreleyin |
Filtre Nasıl Eklenir
- Araç çubuğundaki Filtre butonuna tıklayın.
- Filtre ekle butonuna tıklayın ve açılır listeden bir özellik seçin.
- Operatörü seçin (eşit, eşit değil, içerir, içermez vb.).
- Değeri veya değerleri seçin.
- Görünüm anında güncellenir.
Birden fazla filtre yığabilirsiniz. Tüm filtreler varsayılan olarak VE mantığıyla birleştirilir — bir öğenin görünmesi için her aktif filtreyle eşleşmesi gerekir.
İPUCU
Tüm filtreleri hızla kaldırmak için filtre panelindeki Tümünü temizle butonuna tıklayın.
Adım 3 — İş Öğelerini Gruplandırın
Gruplama, öğelerinizi paylaşılan bir özelliğe göre bölümlere düzenler. Bu, tüm görünümlerde çalışır.
- Araç çubuğundaki veya görüntüleme seçenekleri panelindeki Grupla seçeneğine tıklayın.
- Gruplamak için bir özellik seçin: Durum, Öncelik, Atanan, Etiket, Döngü, Modül veya Yok.
- Öğeler daraltılabilir gruplara yeniden düzenlenir.
Kanban yerleşiminde, gruplama özelliği sütun başlıklarını belirler. Liste ve Hesap Tablosunda gruplar daraltılabilir bölümler olarak görünür.
Adım 4 — İş Öğelerini Sıralayın
Sıralama, her grup içinde veya tüm görünüm genelinde öğelerin nasıl sıralandığını kontrol eder.
- Görüntüleme seçeneklerindeki Sırala seçeneğine tıklayın.
- Sıralama özelliği seçin: Manuel, Oluşturma tarihi, Güncellenme tarihi, Öncelik, Başlangıç tarihi, Teslim tarihi.
- Artan ve azalan sıra arasında geçiş yapın.
İPUCU
Manuel sıralama, öğeleri özel bir sıraya sürüklemenizi sağlar. Bu sıra görünüm bazında korunur ve ekibinizle paylaşılır.
Adım 5 — Görüntüleme Seçeneklerini Yapılandırın
Görüntüleme seçenekleri, mevcut görünümünüzde hangi alanların görünür olacağını kontrol eder. Araç çubuğundaki Görüntüle butonuna (veya kaydırıcı simgesine) tıklayın.
Yaygın görüntüleme seçenekleri şunlardır:
- Alt öğeleri göster: Alt öğeleri satır içi genişletin veya daraltın.
- Boş grupları göster: Öğesi olmayan grupları gösterin veya gizleyin.
- Gösterilen özellikler: Belirli özellik sütunlarının görünürlüğünü değiştirin (öncelik, atanan, etiketler, tarihler, tahminler vb.).
Kullanılabilir görüntüleme seçenekleri yerleşime göre biraz farklılık gösterir. Örneğin, Gantt yerleşiminde zaman çizelgesi yakınlaştırma düzeyi için seçenekler bulunurken, Kanban yerleşimi kartlarda hangi özellik alanlarının görüneceğini seçmenize izin verir.
Adım 6 — Görünümü Kaydedin
Yeniden kullanmak istediğiniz bir görünüm, filtre, gruplama ve sıralama yapılandırdığınızda, bunu görünüm olarak kaydedin.
- Görünümü kaydet butonuna tıklayın veya proje kenar çubuğundaki Görünümler bölümüne gidin.
- Görünüme açıklayıcı bir ad verin — örneğin, "Yüksek Öncelikli Öğelerim" veya "Atanana Göre Sprint Panosu".
- Erişim düzeyini seçin:
- Özel: Yalnızca siz bu görünümü görebilirsiniz.
- Proje: Tüm proje üyeleri bu görünümü görebilir ve kullanabilir.
- Çalışma alanı: Tüm çalışma alanı üyeleri bu görünümü görebilir ve kullanabilir.
- Kaydet'e tıklayın.
Kaydedilen görünümünüz kenar çubuğunun Görünümler bölümünde görünür. Kaydettiğiniz tam yapılandırmayı yüklemek için istediğiniz zaman üzerine tıklayın.
Kaydedilmiş Bir Görünümü Güncelleme
Kaydedilmiş bir görünümün filtrelerini veya yerleşimini değiştirirseniz, mevcut görünümü güncellemek mi yoksa yeni bir görünüm olarak kaydetmek mi istediğinizi soran bir istem görünür.
Kaydedilmiş Bir Görünümü Silme
Görünümü açın, görünüm adının yanındaki üç nokta menüsüne tıklayın ve Görünümü sil'i seçin. Bu işlem geri alınamaz.
UYARI
Çalışma alanı düzeyindeki bir görünümü silmek, onu tüm üyeler için kaldırır. Silmeden önce görünümün artık gerekli olmadığından emin olun.
Adım 7 — Çalışma Alanı Düzeyinde Görünümleri Kullanın
Proje düzeyindeki görünümlere ek olarak, SetGet tüm projeleri kapsayan çalışma alanı düzeyinde görünümleri destekler.
- Çalışma alanı kenar çubuğundaki Görünümler bölümüne gidin (herhangi bir projenin dışında).
- Yeni bir görünüm oluşturun veya mevcut bir görünümü açın.
- Çalışma alanı görünümleri aynı yerleşimleri, filtreleri, gruplamayı ve sıralamayı destekler — ancak erişiminiz olan tüm projeler genelinde uygulanır.
Bu, atanan tüm öğelerinizi, projeler genelinde tüm acil öğeleri veya projeler arası bir Gantt grafiğini görmek için kullanışlıdır.
Özet
Artık beş görünümün tümünü nasıl kullanacağınızı biliyorsunuz (Liste, Kanban, Hesap Tablosu, Takvim, Gantt), odağınızı daraltmak için filtreler uygulayabilir, öğeleri gruplandırıp sıralayabilir, görüntüleme seçeneklerini yapılandırabilir ve tekrar kullanmak için görünümleri kaydedebilirsiniz. Farklı kombinasyonları denemek, ekibinizin iş akışı için en uygun kurulumu bulmanıza yardımcı olacaktır.
İlgili Sayfalar
- Views Overview — Full reference for views and saved configurations.
- Filters Reference — Complete list of filter operators and usage.
- Display Options — Detailed guide to display settings per layout.
- List Layout — Deep dive into List layout features.
- Kanban Layout — Deep dive into Kanban layout features.
- Spreadsheet Layout — Deep dive into Spreadsheet layout features.
- Calendar Layout — Deep dive into Calendar layout features.
- Gantt Layout — Deep dive into Gantt layout features.
- Collaborate on Work Items — Comments, assignments, and activity tracking.